Last year I had need to help out with digitizing an old book, so that its current content can be updated, expanded and ultimately reprinted. The current copy was written directly on a typewriter and ran to almost 250 pages of very dense text. Transcribing that much content manually was not an enticing prospect, so I started investigating the options for automation. I quickly found the open source Tesseract OCR software which runs on Linux, Windows and OS-X. This dates back into the mid-80’s and was open sourced by HP in 2005. Tesseract just focuses on the core OCR tasks, and leaves image acquisition to other tools; likewise post-recognition processing.
Reading about how it works it becomes clear that the biggest factor in accuracy is the quality of the input images. It converts the input image to monochrome, approximately speaking, by applying a threshold algorithm to the image. For this to work effectively the image has to be evenly illuminated; any kind of gradient across the background will confound the monochrome conversion leading to large blocks of text getting lost.
A flatbed scanner is not a satisfactory way of capturing the pages of the book because it is impossible to get the pages flat without damaging the spine. Instead a digital SLR camera is the preferred tool, with flashgun(s) to provide illumination. Even when using a camera, the spine of the book is still a problem as if you simply open the book on a flat surface the pages will curve near the spine leading to uneven illumination & distortion of the text which will ruin OCR accuracy. The solution to this is to construct some kind of book scanning rig that will support the book such that it opens to an angle somewhere in the region of 110-140 degrees. This might sound like overkill for a single book, but it is well worth the effort.
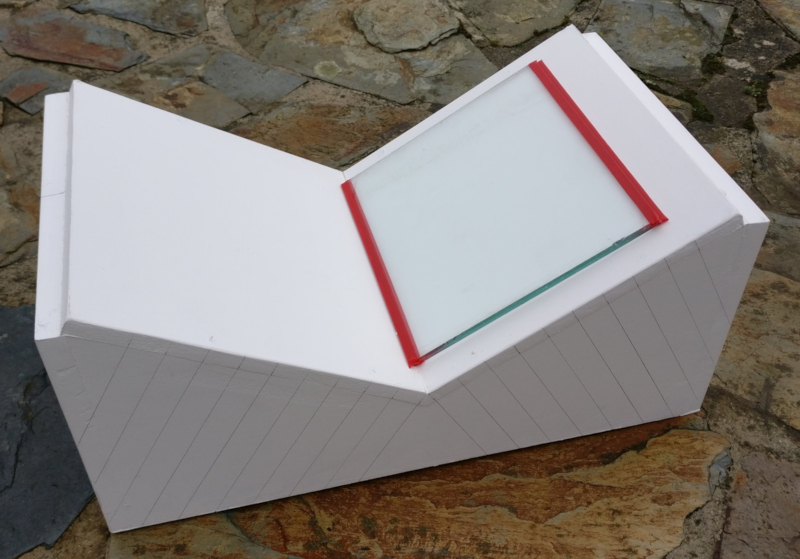
The simple book scanning rig, constructed from MDF, large enough to hold a book upto approximately 20x30cm in size.
The rig is very simple to construct requiring little more than a sheet of MDF, wood screws, a jigsaw, drill and screwdriver. The exact dimensions are not important, this one was sized to fit the book that was being digitized using off-cuts of MDF leftover from a previous job. Two rectangular pieces of MDF were used to form the long sides of the rig, and v-shape cut out from them to form an angle approximately 120 degrees . Two more pieces of MDF were cut to form the short ends of the rig. The four peices are screwed together to give the basic box form. A final two pieces MDF are cut to cover over the v-shape depression, and screwed to the sides. The screws were all countersunk and covered with wood filler. The final task was giving the thing a coat of white paint. The construction didn’t take more than an hour and a few hours between two coats of paint. It was allowed to fully dry overnight.
The v-shaped depression cradles the spine of the book, but the pages are still a little curved. The trick to dealing with this is to place a sheet of glass on top of the page. The glass needs to be thick enough to have sufficient weight to hold the pages completely flat. A salvaged window pane in the workshop happened to be the right size and suitable weight. If buying glass new it is preferable to have the edges rounded off smooth. The salvaged glass had rough edges so some red electrical tape was stuck over the edges to protect the book. Bear in mind that the tape must not cover any text that needs scanning – generally there are sufficient margins in books that this won’t be a problem.
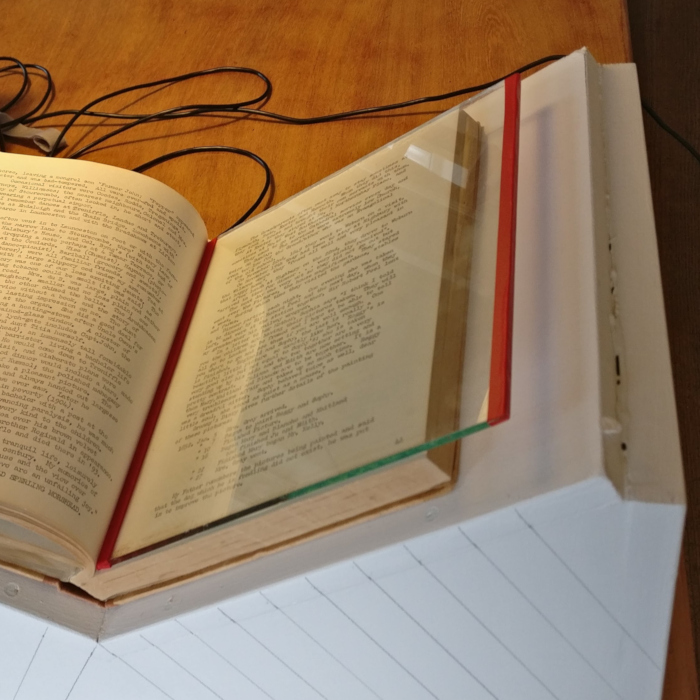
Book on the scanning rig with glass weight holding the page flat
With construction of the rig to support the book complete, it was time to begin the image capture process. To avoid distortion of the text, the camera needs to be perfectly aligned such that the lens is perpendicular to the page. Needless to the say, the camera needs to be placed on a tripod and positioned over the pages of the book. The parallel pencil lines drawn on the side of the book scanner rig are there to assist in aligning the camera. The OCR process will work best with images that have a resolution of at least 300 DPI. To get near this kind of resolution, the camera lens needs to be chosen to ensure the page will fill the image. Zoom lens in particular suffer from geometric distortion at their extremes of focal length and aperture. Picking a middling aperture in the region of f/8 will minimize the distortion & thus improve OCR accuracy.
To avoid a gradient across the background of the page the lighting setup during image capture is important. It is unlikely that either normal room lighting or natural lighting from windows will give even illumination. It is better to take full control by using camera flash guns. Ideally a pair of flash guns would be positioned either side of the book, their combined beams giving the desired result. I only had a single flash gun available, but the room was blessed with large white walls and ceilings. The flash gun was thus pointed at an angle towards the wall on a wide spread. This required a high power level on the flash, but the resulting reflected light gave excellent results.
It is possible to do everything in camera, but since I wrote the Entangle Photo software for controlling digital SLRs, I naturally used a laptop to control the camera. This allowed the images to be reviewed on a large display on the fly. It was now simply a matter of running through the book, turning the page and pressing the shutter button ~250 times. It was quicker to capture all the odd pages first, and then flip the book around and capture all the even pages. If capturing lots of books a second camera would be desirable allowing odd and even pages to be captured at the same time.
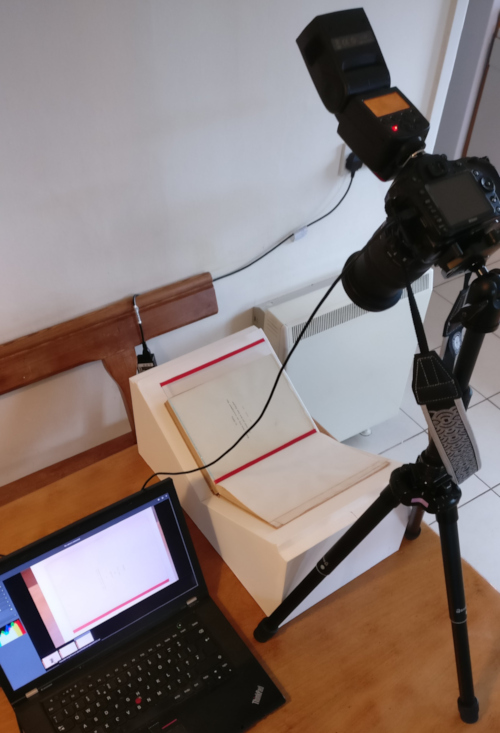
Camera mounted on tripod above the book scanning rig. Flash gun is pointed at a white wall for reflected light. The laptop controls the camera and displays captured images.
With this rig in operation it was possible to easily capture about 6-8 pages a minute, allowing the whole book to be captured in less than 40 minutes. Due to the positioning of the camera rig, the pages were all perfectly square wrt the image, but it is still necessary to crop the images to eliminate borders which can confuse the OCR process. The Darktable application makes it easy to process large numbers of raw images, cropping them all to the same extents.
The cropped images can now be through the Tesseract command line program to perform the OCR process. The results, for the most part, were really very impressive in terms of accuracy. Where it had problems in particular were with some pages typed on very thin paper, such that text from the reverse would bleed through. Those pages had to be thrown away and transcribed by hand, but this was only 6 pages out of 250. It uses a language dictionary to analyse the recognised text and resolve ambiguity. This can lead to similar looking words being substituted and it notably falls down on place and person names which are largely absent from the dictionary.
The results of OCR on each image were saved to a separate plain text file. These were loaded up in gedit and the input images loaded up in gthumb. Their respective windows were tiled such that they filled the screen side-by-side. gedit annoyingly doesn’t have a way to turn on the spell checker by default, but a one line change in the source code & a rebuild was sufficient to fix this. Each text file had to be read through and the highlighted spelling mistakes all corrected. This was by far the most time consuming part given the large amount of text per page, taking 1-3 minutes per page depending on the quantity of corrections needed, adding up to many hours work in total across the full 250 pages.
The OCR process aims to preserve the page layout so will put hard line breaks after every line of text. The new digital edition of the book is expected to be printed at a different size than the original, so the layout was inevitably going to change. Thus a second pass through every page is made to remove the hard line breaks, leaving just the paragraph breaks.
Each plain text file still represents a single page, so they are now concatenated with form feed character inserted between each file’s contents. The digitizing of the book is essentially now complete and the result ready to be loaded into LibreOffice for the interesting editing work to start. It is hard to accurately say how long the whole digitization process took, since the effort was spread, sporadically, a little at a time over a large number of weeks. It was, however, definitely faster and less tedious than transcribing the entire text of the book manually. With good quality input images, and the right language dictionary, the accuracy of Tesseract OCR is very impressive and well worth using.
I love your precise descripition. Very detailed. When i have to scan thin pages with the back side shining through, i use a thin sheet of black paper and put it behind the page. the scanned result is much better, but is has a different grayscale in the white part of the page, that can easily be adjusted with an image software like gimp, paint.net or of course “the professional one”.
I will try your workflow for some books i dont want to carry in my bag on my holidays.
While reading a need big letters, my e-Book reader is perfect in that matter
Greets Horst