London Photographic Light Painting Workshop

Through the London Photographic Meetup group I’ve been to many different photographic workshops, learning a great deal. Over the past couple of years, the group has had quite a strong focus on lighting related workshops, covering various aspects of studio lighting & off-camera flash. It was one of the off-camera flash workshops, 3 years or so back, that motivated me to create the Entangle Photo application for Linux desktop users.

The workshop that I’ve long wanted to attend, but never had the chance to, is their “Light Painting” one. Last week I finally got the opportunity and was not disappointed. The location varies from event to event, with this particular workshop taking place in Green Park. We started out in a cafe where the organizers described the various pieces of equipment we’d be using. There were basically two devices, a light string (a long cable with a bundle of 30 leds on its end) and a light stick (a ~1m long piece of wood with an led every ~3cm). Neither are things you can buy pre-built in the shops – the London Photographic organizers home-build them all from electronics purchased on eBay.

Setup

The weather was a bit on the iffy side, so we started out with umbrellas being held over our cameras, but we didn’t let that put us off the evening’s activities. In any case, the rain had pretty much stopped after the first 30 minutes of the session. The plus side was that the rain made the ground reflect a little more of the light. As might be expected, the exposures are on the long side, with the iso/aperture dialled in to achieve the desired ambient illumination, while still allowing on the order of a 1 minute shutter opening to give time to produce the light effects. Needless to say, the cameras were on tripods and shutters triggered using cable release. With such long shutter speeds, we’re shooting in “bulb” mode with someone counting time on a stopwatch.
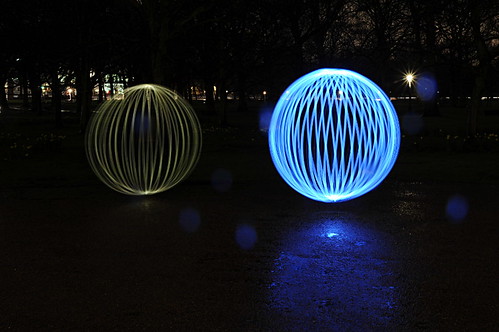
Light orbs

The first effect attempted was to produce basic light orbs. These are achieved using the light strings, by swinging the string in a circular motion in front of your person, while slowly rotating your feet through 180 degrees. Done correctly this results in an attractive orb shape
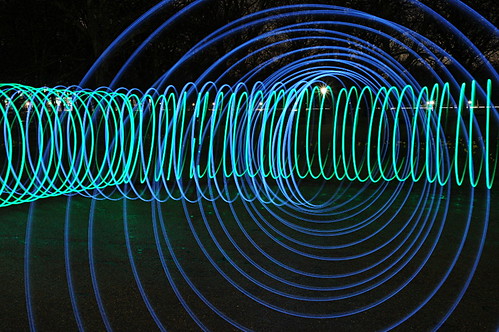
Light tunnels

Another effect that can be produced using the light strings, are tunnels / tubes of light. The starting premise is much he same as for the light orbs, simply swinging the string in a circular motion in front of your person. Instead of rotating on the spot though, you slowly walk forward / around the scene.
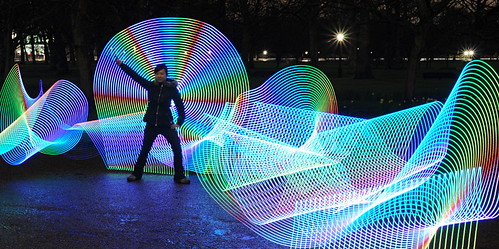
Light trails

Following on from the basic light orbs, the organizers got out the light sticks. The light sticks have fancy controllers for choosing between a range of different colours, or even strobing through the colours in a sequence. The technique is simplicity itself, simply turn on the light stick and walk it around the scene. The key is to keep your motion of the stick fluid, to avoid jagged edges on the light trails.

The Peacock

As mentioned above, smooth movement of the light stick is key to getting continuous light trails. For the next trick, the goal was to produce perfect circles of light. Acceptable results cannot be achieved by hand-holding the light stick, so the trick here was to put a bolt through one end of the light stick, and then fasten this to a tripod head in some manner. The light stick can now be smoothly rotated through 360 degrees, producing perfect circles of light, which I’ve named “The Peacock”
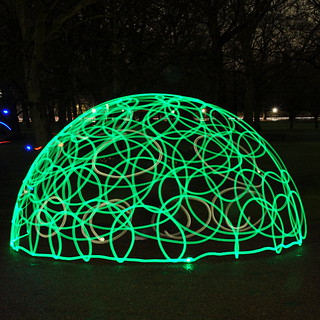
The Brain Orb

The final technique of the night was the most difficult and time consuming. This involved a long pole, with a bundle of leds on its end. Kneeling in one spot, the goal is to trace out a sequence of hoops gradually building up the doom pattern, which our organizers nick-named “The Brain Orb”, though it reminds me of an igloo.

Parting thoughts

The general aim of the workshop was for the organizers to demonstrate the techniques above so that we, as photographers, understood how to achieve the various different light painting effects. The workshop lasted several hours, late into the evening, but even with the small group (~15 photographers) there wasn’t time for us to try out every technique ourselves. The idea is that after completing the workshop we’d have the knowledge required to go off and put the techniques into practice ourselves. I’m certainly intending to do some experimentation in this area myself. The organizers themselves did a great job at running the event & getting through the material. If anyone reading this is interested in light painting, and based in London, it is well worth keeping your eyes open for future repeats of the light painting workshop (won’t be until autumn time though, due to need for dark evenings!).

One idea I had to improve the results from “The Peacock” technique is to bring in an off camera flash. The camera settings are dialled in to expose for the ambient, while giving plenty of time for the light painting technique. What we can’t do with this, is get a nice exposure of the subject’s face. By adding in a low power pop of off-camera flash at the end of the exposure, we could nicely bring out the features in the subject’s face.

A visit to Nunhead Cemetery

Nunhead Cemetery, one of the “Magnificent Seven” Victorian cemeteries in London, was the location of an afternoon walk last Sunday. While originally open & landscaped, these days Nunhead is primarily a woodland which happens to have gravestones hiding in its undergrowth.

As a result of the unchecked plant growth & minimal maintenance many of the graves are in a somewhat hazardous state. On the day we were there, FONC had one of their volunteer maintenance days taking place, doing what they could to keep things in some sort of order

Due to the time of year, the light was fading fast, even though it was only around 3 in the afternoon. Fortunately, anticipating the lack of light amongst the trees, I had packed a Nikon SB-600 flash in my bag. For the image of the cross below, an exposure of f/13 @ 1/200s ISO 640 removed pretty much all of the remaining ambient light. The SB-600 hand held above & to the right of the camera provided the only light on the cross

One of the highlights of Nunhead cemetery is the grand avenue running from the main entrance to the (now derelict) chapel.

In the image above, the underneath of the archway gets much less light than the surrounding brickwork. I decided to have a go at illuminating the archway with a flash burst. To hide the flashgun from the camera, it had to be positioned behind one of the pillars. Ideally I would have had two flashguns, one behind each pillar to ensure even lighting, but I had to make do with one set to give the widest possible spread. Since it was hidden behind a pillar, the flash couldn’t be triggered using Nikon CLS which requires line of sight. Along with the flash though, my bag also contained a pair of Cactus V5 wireless triggers, which operate using radio waves rather than infrared. Rather than try to match ambient and flash light levels, I decided to accentuate the interior of the archway:

The images above were all taken with a DSLR, but I also had my ZeroImage 2000 pinhole camera long. Using Ilford Delta 3200 ISO film, I was getting anywhere between 8 and 80 second long exposures. The roll is still waiting to be sent off for processing, so I’ve no idea how the images will turn out, but I’m hoping for some really grainy & gritty shots. Due to the failing light (and the gate closing time of 4pm), I only spent just over 1+1/2 hours at the cemetery, which is barely enough to scratch the surface. It is a location on the list to be re-visited later in the year…

A review of the JJC LED ring light

One of my photography related Christmas gifts this year was a JJC LED ring light from a UK Highland Photography via Amazon. As can be seen from the photograph, the LED ring component attaches from the front of the camera lens using one of six possible adapters (thread sizes 49mm/52mm/55mm/58mm/62mm/67mm). Power is either from 4x AA batteries in a pack which attaches to the camera base via a standard tripod screw thread, or from a 240v  mains A/C adapter. The build quality on the unit is very good and there’s not much weight to it (aside from the AA batteries). The photo below shows the ring light attached to the battery pack, in turn attached to my Nikon D90 via the tripod bolt

LED Ring Light

First of all, it is not really right to compare this LED ring light with much more expensive ring flashes like this Metz. The latter cost several £100 while this LED ring light costs a mere £30. A ring flash will provide a significantly more powerful light, making it suitable for a wide variety of scenarios in particular as a fill light for portrait photography. While the LED ring light is very bright to look at, it is only really powerful enough if used fairly close to the subject, for example, in macro photography.

To get an idea of its power, I did a couple of test shots, First of all, just a boring shot of a cutting mat, positioned 10 cm from the camera. The ambient light provided an exposure of 4s @ f/8 + ISO 400 (left hand image); With the ring light on, the exposure was much more satisfactory 1/320 sec @ f/8 + ISO 400 (right hand image). NB the colour difference here is primarily due to different white balance – the ambient was approximately tungsten, while the ring light is approx flash.

Cutting Mat Cutting Mat

The second test was done using a slightly more interesting subject – a dried fruit Christmas decoration

Christmas Decoration - Dried Fruit

To evaluate light falloff, I made a variety of exposures with different camera <-> subject distances. Starting at a distance of 8cm, ambient light provided an exposure of 20 secs @ f/29 + ISO 400; With the ring light on, the exposure was 1/60 sec @ f29 + ISO 400. Moving the camera out to 20cm from the subject, the ring light provided an exposure of 1/30 sec @ f/29 + ISO 400. Moving further out to 30 cm, the ring light provided an exposure of 1/10 sec @ f/29 + ISO 400.

LED Ring Light


From these figures you can see that if you tend to use tiny apertures (eg f/64) and fast shutter speeds (eg 1/200 sec) at the same time, then this light probably isn’t sufficiently powerful on its own, unless you are willing to raise ISO and work very close to the subject. On the plus side, since it provides a continuous light source, this ring light greatly facilitates focusing, arguably making it more useful than a ring flash for macro work. My take away from the test shots is that this product provides a great general purpose light source for macro work. In scenarios where it isn’t powerful enough on its own, it could be paired up with an off camera flash, the ring flash serving as illumination for focusing & the fill light, and the flash serving as the key light. For the price point, IMHO, you can’t go wrong using this LED ring light for macro work.