Experiments with the chemigram process, part 1

The previous blog post introduced the chemigram process, a means of creating images using photographic materials to write with chemistry instead of writing with light. This post will examine some of the initial experiments personally undertaken to explore and gain an understanding of the process.

Honey resist

For the first attempt at making chemigrams, I used Ilford Multigrade RC paper, and covered it in a resist of set, but still easily spreadable, honey. I applied the honey with a kitchen knife and attempted to smooth it out as much as possible over the entire sheet of paper. None the less it was still a fairly uneven thickness. Fotospeed FX30 odourless fixer was paired with Caffenol C-H-UK developer and water stop bath. It immediately became apparent that caffenol is not the best choice of developer for chemigrams. Functionally it worked just fine, but practically it was a pain as the opaque brown colour prevents the changes in the chemigram being visible without removing the paper from the dev. Still, we must work with what we have at hand, and that happened to be caffenol this time.

The paper was switched back and forth between the developer and fixer, allowing anywhere between 30 and 120 seconds in each chemical at a time. The honey resist proved fairly stable, adhering to the paper well and gradually dissolving over about 10 minutes. There was little need to agitate the trays nor to manipulate the resist.

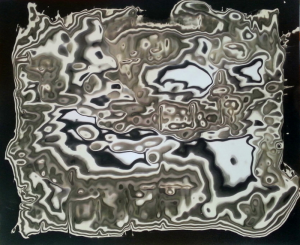
Chemigram with a resist of set honey.

The darker black and pure white areas seen at the edges and just below center were a result of the paper being exposed to the developer and fixer for their nominal processing time (~120 secs). The paler grays and dirty whites were a result of shortened exposure to the chemicals (~30 secs). The alternating bands of dark and light clearly illustrate how the resist was gradually dissolving while being switched between chemical baths.

Artists’ varnish & masking fluid resist

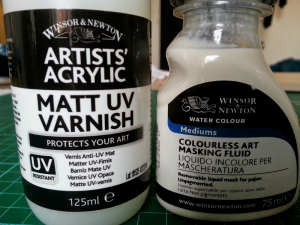
In a visit to the local art supplies store, I discovered a variety of different products that could serve as resists for the chemigram process. A random choice resulted in the acquisition of a bottle of Windsor & Newton Artists’ Acrylic Matt Varnish, and a bottle of Windsor & Newton Colourless Art Masking Fluid.

Artists varnish and masking fluid, to be tested as potential chemigram resists.

Artists varnish and masking fluid, to be tested as potential chemigram resists.

Once again some Ilford multigrade RC paper was used, three pieces were coated with the varnish and three pieces were coated with the masking fluid. In all cases the fluid was applied using a small paintbrush, but to investigate the effects of brush stroke pattern on the final image, different patterns were used when applying the fluids. In one the brush strokes were diagonal, in one they were horizontal and in the other they were completely random swirls. Interestingly there was an immediate effect on the colour of the paper – masking fluid turned it immediately blue while varnish turned it immediately pink. Neither colour would ultimately persist in the final image, so this difference in behaviour doesn’t appear to have a practical use.
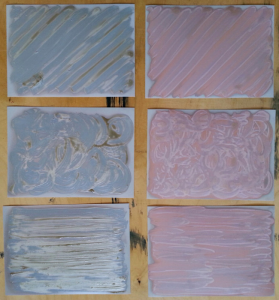
Papers coated with artists' masking fluid (left hand column) and artists' varnish (right hand column)

Papers coated with artists’ masking fluid (left hand column) and artists’ varnish (right hand column)

Once the resists were dry (only a matter of an hour or so) they were intentionally damaged. On some of the sheets of paper I used a knife to score some straight lines across the resist, while on others I used a compass with blade attachment to score some circles / arcs. The varnish was easily penetrated by the blade without applying any pressure. The masking fluid resist was slightly more difficult to score as it had quite a rubbery texture when dry – a sharp blade was required. Even now the rubbery dried masking fluid would come off the paper without much effort if rubbed.

As before the chemicals were Fotospeed fixer and Caffenol-C-H-UK developer. The sheets of paper were fully submerged in the chemical baths at each step, going back and forth several times. The artists’ varnish resist did not have much permanence, dissolving and flaking off in the chemicals very quickly. The image was almost entirely based on the pattern of the brush strokes used to apply the resist – scoring the mask had no perceptible effect. The developer appeared to penetrate the resist depending on its thickness to darken the image and the fixer removed the rest of the resist.
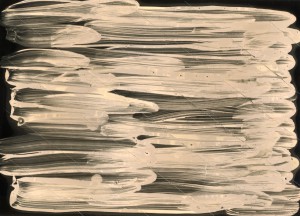
Windsor and Newton Artists' Acrylic, Matt UV varnish resist. The only texture shown in the image matches the brush strokes of the resist. The chemicals penetrated the resist quickly and it dissolved & flaked off before any alternating bands would form

Windsor and Newton Artists’ Acrylic, Matt UV varnish resist. The only texture shown in the image matches the brush strokes of the resist. The chemicals penetrated the resist quickly and it dissolved & flaked off before any alternating bands would form

The resist using masking fluid was somewhat more satisfactory. It did not appreciably dissolve in the chemicals, not did they penetrate through the resist. The chemicals could work on the paper in areas where the resist had been scored with a blade. Rubbing on the resist would cause the rubbery mask to come away from the paper, though a gentle touch was needed otherwise massive amounts of resist would come loose in one go.
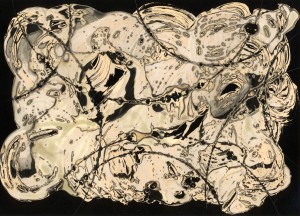
Windsor and Newton masking fluid resist, with circular marks scored into the resist with a compass and blade

Windsor and Newton masking fluid resist, with circular marks scored into the resist with a compass and blade. Developer was first bath, hence black border
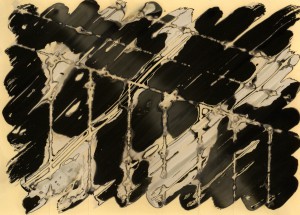
Windsor and Newton masking fluid resist, with straight lines scored by a knife.

Windsor and Newton masking fluid resist, with straight lines scored by a knife. Fixer was first bath, hence white border.

Overall the artists varnish proved a disappointment, while the masking fluiding showed some hints of promise when damaging it with a knife. The ease of removal of the masking fluid when the image was finished was particularly appealing.

Stencils

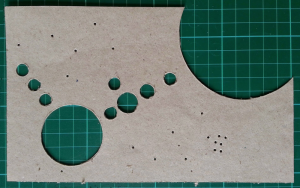
For this experiment, instead of using a resist to control the action of the chemicals, it was decided to make a stencil. A piece of 3mm thick fibre/cardboard was used for the stencil and various circular holes were cut using a compass fitted with a blade. In addition, some pinprick holes were made randomly in the card

Piece of cardboard with spheres cut out to act as a stencil for applying developer/fixer to paper.

Piece of cardboard with spheres cut out to act as a stencil for applying developer/fixer to paper.

For its first use, developer was chosen as the chemical to paint in through the stencil. This resulted in a predominantly white background, with areas of black where the developer was painted. From the results it can be see that the developer soaked into the cardboard and run underneath the edges, so the outline on the image is far rougher than the stencil. There is an attractive highlight around the edges of the circles though – this appears to be something to do with the ineraction of the surface tension of the developer and the edge of the stencil.
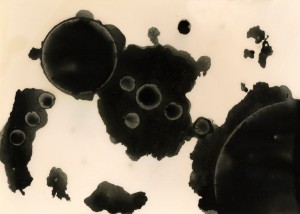
Cardboard stencil was placed on to the photo paper and developer painted into the holes. Developer washed off and then image fixed.

Cardboard stencil was placed on to the photo paper and developer painted into the holes. Developer washed off and then image fixed.

For the second use of the stencil, the fixer was picked as the first chemical to apply. The cardboard was fairly contaminated with developer from the first usage, which no doubt had an impact on the effectiveness of the fixer. The fixer was not left to act for long enough either. When the print was moved into the developer bath to form the background, even the areas exposed to the fixer initially darkened.
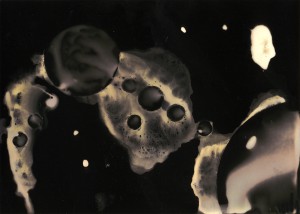
Cardboard stencil was placed on to the photo paper and fixer painted into the holes. Fixer washed off and then image placed in developer, followed by a bath in fixer.

Cardboard stencil was placed on to the photo paper and fixer painted into the holes. Fixer washed off and then image placed in developer, followed by a bath in fixer.

The stencil idea is promising, but further investigations are needed to identify a more suitable material to use as the basis of the stencil. At the very least a less porous form of cardboard seems necessary. Alternatively it might be interesting to the use the stencil as a mask for the applying the resist, instead of directly applying the developer/fixer.

In the next part of the blog post, some further types of resist will be illustrated along with a method of creating a “stamp” for printing with chemicals.
An introduction to the Chemigram process

The chemigram process is an artistic technique that involves the use of photographic materials and chemicals, but counter-intuitively will not generally be classified as a photographic process. Considering a fairly broad interpretation, photographic processes involve the formation of images by exposing some kind of sensitive emulsion to light. This may involve use of a camera, or may be entirely camera-less, but it is still “writing with light” as the formation of the image is dependant on the amount of light reaching each discrete point on the paper. As chemigrams are commonly (but not required to be) created in conditions of normal daylight, the photo-sensitive emulsion will be fully saturated by light almost immediately. It follows that the image formation is not based primarily on exposure to light, and thus precludes its classification as a photographic process.

Chemigram 1.8 olive oil resist, by Carol Shergold, licensed CC BY

Chemigram 1.8 olive oil resist, by Carol Shergold, licensed CC BY

The basic idea of a chemigram is that photographic paper is alternately & repeatedly exposed to both developer and fixer. Areas of the paper exposed to developer first will tend towards black (since the paper is fully saturated with light), and areas of the paper exposed to fixer first will tend towards white. Obviously if a plain sheet of paper is placed in a bath of developer the whole sheet will go black which won’t be too interesting. So the technique involves some method of influencing which areas of the paper get exposed to the chemicals at each step, thus forming the desired image. As such the process is best described as “writing with chemistry”.

The chemigram process was invented and pioneered by Pierre Cordier, who sub-divides the practice into three categories:

  1. Chemigram without resist. The developer / fixer will be applied directly to the paper, using paint brushes, sponges, etched plate, stencils, stamps or any number of other instruments. This technique takes the chemigram close to traditional painting practices. Pigment based paints have simply been substituted for photographic developer & fixer.
  2. Chemigram with resist applied by hand. The paper will be coated with some kind of product that resists the effects of the developer and fixer. As the paper is passed back & forth between the developer and fixer, the mask will gradually come off allowing the chemicals to form an image.
  3. Chemigram with resist applied by photographic process. Again the paper will be coated with some kind of resist, but in this technique the resist will be applied using some photographic process such as silk screen printing with photo emulsion. This takes the chemigram close to traditional photographic practices.
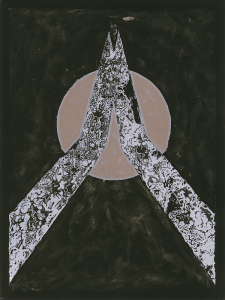
Prayer to the sun

Prayer to the sun by Balazs Sprenc, licensed CC BY-NC-ND

The variables

As with any artistic process though, there are no strict barriers – elements of each of the three categories can be applied in the same image if desired. For example an initial part of the image can be formed by painting developer/fixer onto the paper using a brush. Once that is completed, a resist can be applied to the remainder of the paper and further developed/fixed. The chemigram technique could also be combined with regular photographic processes such as photograms / lumen printing at the artists discretion. There are an immense range of factors that can be varied to influence the resulting image. A non-exhaustive list would include

  • Type of paper – resin, or fibre based, which manufacturer, which variety, fixed grade, or multigrade, etc. Any photographic darkroom paper ever produced is a candidate for use with the technique.
  • Age of paper – if you have a box of expired paper from 1960, don’t overlook it. Since the chemigram is commonly created in broad daylight, fogged paper is not a problem to worry about.
  • Type of resist – any product which will adhere to the paper even for a mere second, whether it be varnish, paint, masking fluid, honey, flour paste, egg, clay, butter, or wilder ideas
  • Additions to the resist – no need to stick with the basic product – if honey is too thin, add flour or sugar to thicken it up. If the resist is too transparent to see, add some dye / food colouring. The resist sticks too well, mix it with something that’s more soluble.
  • Application of resist – the resist applied with fingers, knife, brush, spray, stencil, roller, sponge, quill, etc. The tool used will affect the surface texture of the resist, which in fact can affect how evenly the chemicals penetrate the resist. For example, brush strokes left in the resist may transfer to the paper if the resist is porous to the developer/fixer.
  • Resist drying time – the length of time a resist is left to dry will affect how easily it comes off in the chemicals. Leave it the minimal time to adhere to the paper, or until it is 100% dry and hardened, or anywhere in between. The harder the resist has set the slower the chemicals will penetrate it, giving more time to work the image.
  • Ambient lighting conditions – while normal daylight is most common, a darkroom could allow for localized light exposure and/or combination with other photographic techniques. For example the paper may be initially contact printed, and then a resist applied over part of the image, letting the uncovered image fix immediately.
  • Area of paper with resist – the resist does not have to be applied evenly to the entire paper. Specific areas can be covered by resists, or left uncovered.
  • Damage to the resist – once coated the resist can be intentionally compromised to allow the chemicals to penetrate more easily. For example a knife can be used to cut through dried varnish. Or paper can be bent to crack the surface of hardened resists
  • Chemical types – different brands or mixtures of developers and fixers have different effects on the tones exhibited by the paper. If regular dev is not doing what you like, you can even try lith developers.
  • Chemical strength – more concentrated developer/fixer will speed up the process which may save time. Conversely less concentrated solution allow greater time to finesse the image
  • Toners / dyes – as with any photographic print, toner / dyes can be applied to adjust the colour of the final print
  • Time in the baths – the time spent in developer / fixer before switching to the alternate bath will determine how much time it has to penetrate the resist and bring out the tones of the paper. To get tones in between black and white, leave the print in the chemicals for less time, so the fixer/developer has not fully taken effect.
  • Application of chemicals – the developer / fixer can be applied by dunking the prints in trays, or it can be applied directly to the paper using a tool, such as brush, sponge, etc. The latter would allow for much more localized control of the image formation.

Any analogue artistic process will result in unique works, but with some processes it is practical to create editions of work that are fairly close to identical. This is particularly true of techniques that involve an element of printing whether photographic or not. This is not the case with chemigrams, especially when resists are used. There is a very strong element of non-deterministic behaviour in the creation of chemigrams with the result that even if the exact same steps are followed each time, each final image is likely to be considerably different. There is little scope for creating an edition of identical prints in the strictest sense – at best you will get a family of related works, each with their own distinct character and qualities.

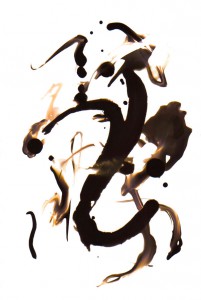
Draco, by Nate Lawson, licensed CC BY-NC-ND

Draco, by Nate Lawson, licensed CC BY-NC-ND

The equipment

Getting started with the chemigram process is remarkably straightforward, with little equipment and no darkroom required. The minimal setup would consist of 3 darkroom print trays, a 1 litre measuring jug, a bottle each of black & white developer and fixer and a packet of black & white photographic paper. The print trays, jug and B&W paper are easily found on ebay, as many people are selling off old darkroom equipment for next to nothing – 15 pounds for all those items would be easily attainable. There’s no need to worry whether the paper is outdated, or fogged, as chemigrams are usually created in daylight. The developer and fixer can be obtained online from a couple of suppliers in the UK for no more than 10 pounds each for 1 litre bottles.

The process

To start off mix up 1 litre of developer at the recommended dilution (typically 1:9) and pour it into one tray. Do likewise for the fixer and pour it in the second tray. Put a litre of tap water in the third tray. The temperature of the solutions in each tray should be approximately 20C but accuracy is not important for this process – changes in temperature will merely affect the speed of the process. One could use stop instead of water for the third tray, but again that isn’t too important – both the developer and fixer will get so badly contaminated with the residue from the resists that they’ll be disposed of before cross-contamination becomes a significant issue.

Assuming you intend to only ever use the paper for chemigrams, you can take sheets straight out of the lightproof black bag in daylight. If you ever want to use the pack of paper for real darkroom work though, make sure you have a changing bag or some other means of removing sheets of paper in the dark, to avoid fogging the remainder of the pack.

Take a sheet of paper and apply whatever product you wish to use as resist. A good place to start is with something that is soft, spreadable and sticky – thick honey, syrup or mustard. Coat the paper completely, or just partially, as you wish. Then place the paper into either the developer or fixer tray, again it doesn’t matter which. Let the paper soak for an arbitrary amount of time. If desired, physically rub away at the resist a little, or just let the chemicals slowly dissolve it. Then take the paper out of the tray and put it in the plain water tray to wash off chemicals. Once washed, put the paper into the other chemical, and again rub the resist if desired. Repeat this, switching between the developer and fixer each time. Either continue until all the resist has gone away, or stop sooner and just wash the remaining resist off the paper. When all resist has gone, put the paper into the fixer for a final time. With the final fix done, wash the print in a fresh bath of water for as long as is needed for the type of paper being used to remove all trace of chemicals.

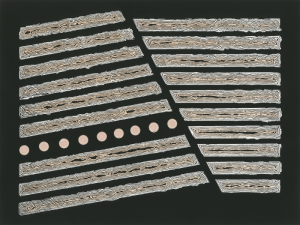
The story of nine dots

The story of nine dots, by Balazs Sprenc, licensed CC BY-NC-ND

The rest

A mentioned earlier, the process was pioneered by Pierre Cordier and he is still probably the most well known practitioner. There was a rare exhibition including some of his work at the Victoria & Albert museum in 2010/2011, for which there is an associated video worth watching online. For a range of articles looking at contemporary artists using the chemigram technique, the extensive nonfigurativephoto blog is worth reading.

The images in this posting are creative commons licensed chemigram works from a couple of flickr users. In the next blog posting I’ll present some of my own initial experiments with the chemigram technique.


Ultraviolet: World Record Cyanotype

At the start of May, the Wellcome Collection organized a festival, On Light, exploring the relationship to light, which naturally included a number of events related to photography and photographic processes. I went along on Saturday 2nd for “Ultraviolet: World Record Cyanotype”, where Melanie King, Constanza Isaza and Andrés Pantoja were aiming to create the world’s largest ever cyanotype print covering approx 110 square meters (actual dimensions 7.5m x 15m). I took along my ZeroImage 2000 camera to document the event, first shooting a roll of Kodak Tri-X 400 black and white 120 roll film and then a roll of Fuji Superia 400 colour 120 roll film.

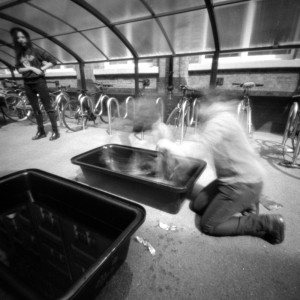
The cyanotype was to be created on fabric, consisting of a number of individual sheets sewn together beforehand to achieve the world record size. The sensitization of the fabric with cyanotype chemicals was performed the evening/night before in St John on Bethnal Green Church. This of course had to be done at night to avoid premature exposure, considering also the long time needed to dry the fabric properly before it could be packed into a black light proof bag for transport. Prior to working with the full sized fabric, a couple of small pieces (estimate about 1.5m x 1m) were used for testing exposure times. Two willing volunteers lay down on the test strips for about 20 minutes, which were then quickly washed. As well as serving as the test exposure, they were interesting demonstrations for the assembled crowd to witness & understand what was going to be done with the full sized fabric.

The test sheet was put through a couple of cold water washes to develop the cyanotype image and wash away remaining chemicals

The test sheet was put through a couple of cold water washes to develop the cyanotype image and wash away remaining chemicals

The results of the 20 minute test exposure showing the outline of a volunteer who lay down to form the image

The results of the 20 minute test exposure showing the outline of a volunteer who lay down to form the image

With the successful test out of the way, the organizers moved forwards to assemble a large group of willing volunteers to be the subjects of the full size record attempt. The general idea was for the volunteers to simply lie down on the fabric in a self-determined pose. In addition to that, there was a collection of random objects, predominantly circular, which were to be laid out on the fabric to give some contrasting shapes in the image. The fabric was swiftly unrolled in a courtyard off Malet Place, the subject & objects took their places and so the exposure had begun.

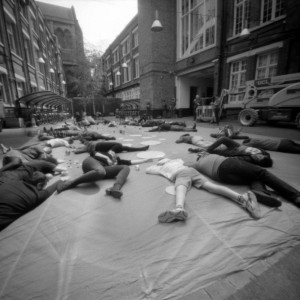
The courtyard was certainly not comfortable, but the volunteers had to remain still for 20 minutes none the less. If you didn't know what was happening you might think there had been an outbreak of a deadly virus

The courtyard was certainly not comfortable, but the volunteers had to remain still for 20 minutes none the less. If you didn’t know what was happening you might think there had been an outbreak of a deadly virus

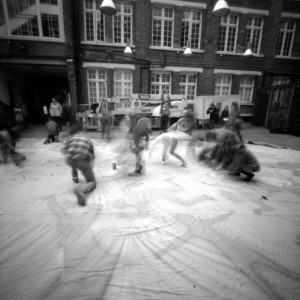
At the end of their nap time, the subjects had to pick themselves up and collect the other random objects that were placed on the cyanotype.  The places where they had been just showed a faint ghostly presence

At the end of their nap time, the subjects had to pick themselves up and collect the other random objects that were placed on the cyanotype. The places where they had been just showed a faint ghostly presence

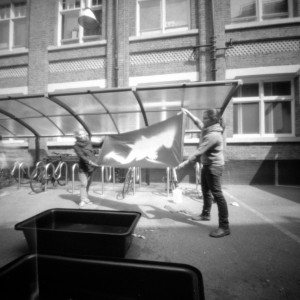
Upon completion of the exposure, the fabric was quickly bundled up and transferred into the large water tubs for washing. This followed the same process as washing the test sheet, except that it took many more changes of the water to fully develop the classic cyanotype blue (& rinse off the chemicals) due to the immense size. After a lot of hard work by the organizers and their team of assistants though, the final result was ready to be revealed.

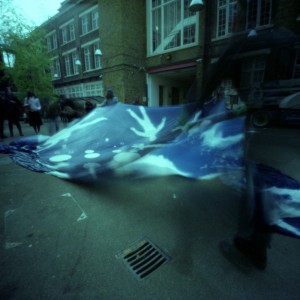
After washing the final developed cyanotype image was revealed to the world.

After washing the final developed cyanotype image was revealed to the world.

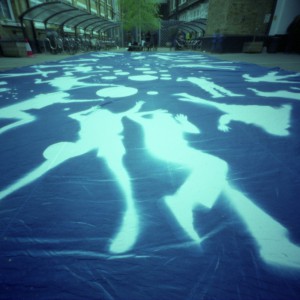
The ghostly impressions after exposure were transformed into dramatic figures after developing

The ghostly impressions after exposure were transformed into dramatic figures after developing

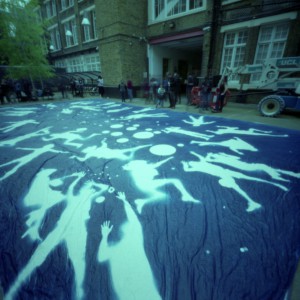
The sheer scale of the finished cyanotype was incredible to behold. The world record attempt was a dramatic success.

The sheer scale of the finished cyanotype was incredible to behold. The world record attempt was a dramatic success.

As can be seen from the images, the world record attempt was an unqualified success. The exposure was spot on, resulting in very dramatic high contrast outlines of the test subjects, even with the dull overcast day. The range of different poses the volunteers had chosen to hold were fascinating & entertaining at the same time. The only so called “problem” to come out of the day, was that of deciding what on earth to do with the finished cyanotype fabric. It would be a shame for it to remain in a bag for the rest of its life, but due to its size, there are obviously few locations / galleries which have the ability to display it. None the less it was recently announced that the fabric will be travelling to Spain to be displayed in the Revel-T festival this summer

The event was inspirational and left me with an enhanced passion for working with the cyanotype process. To anyone attempting to break this record though – don’t underestimate the amount of work involved in achieving something that on the surface sounds rather simple – nothing is easy at this scale, as the organizers and their assistants will attest.

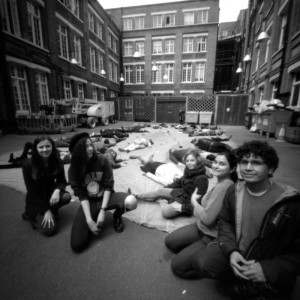
The organizers and some of their assistants. From left to right, Hollie Quinn, Melanie Kathryn King, Francesca Polo, Constanza Isaza Martinez and Tres Peces Navegando.

The organizers and some of their assistants. From left to right, Hollie Quinn, Melanie Kathryn King, Francesca Polo, Constanza Isaza Martinez and Tres Peces Navegando.