Creating chemigram images with caffenol ingredients

Over the past year or two I’ve done a bunch of experiments with the Chemigram process and even combined it with the Lumen process. In the work so far I’ve used various different substances as resists to control the action of the developer and fixer on the paper, thus influencing the pattern of the light & dark regions. Meanwhile for film processing at home I have been using my Caffenol-C-H-UK recipe almost exclusively as the developer. Caffenol is not just for film, it can be used for developing paper too and it occurred to me one day that instead of mixing up the caffenol in a jug, it might be interesting to just let the caffenol ingredients mix and react directly on the paper. So began a new series of chemigram experiments without using any kind of resist at all.

Caffenol is made by mixing washing soda crystals, vitamin C, instant coffee and optionally some iodized salt. The coffee and vitamin-C are the developing agents while the washing soda acts as an accelerator. The first step was to make a solution of washing soda and water and thoroughly soak the sheets of paper in it. The granules of instant coffee can be placed individually on the paper where needed, or simply sprinkled in an adhoc manner. The vitamin-C powder can just be poured or sprinkled onto the paper. The theory is that when the coffee/vitamin-c hits the wet paper it reacts with the washing soda to form caffenol on the surface. This is done in normal lighting conditions so the paper is universally and totally exposed and should gradually turn black where the caffenol has formed.

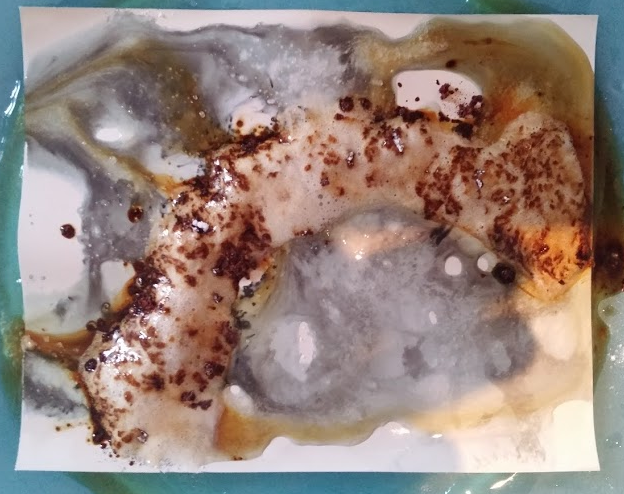
For this first test I used off-cuts of some outdated ~|40 year old) Ilford FB paper approx 5×4 inches in size. It was soaked in warmed (~25 C) washing soda solution then some coffee was sprinkled on, followed by some vitamin-C powder. After a minute or so it is possible to see hints of development along the edges where the paper is going dark gray

Caffenol chemigram initial state
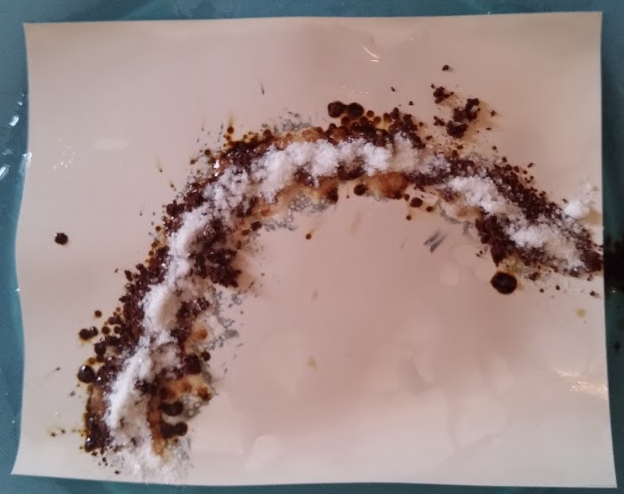
After 5 minutes the developed areas didn’t appear to be getting any darker. I figured that since the paper was quite lightweight and moderately glossy, it was probably not able to absorb very much of the washing soda solution thus limiting how much caffenol can form. The washing soda is critical as an accelerator, without it coffee/vitamin-C are far too slow. So to try and intensify things I used a syringe to squirt on some more washing soda, which made the vitamin-C fizz very nicely. This image shows the run-off is developing the paper quite efficiently after just a minute or so:

Caffenol chemigram developing

The surprise came when I decided to wash off the ingredients. It turned out that the instant coffee had formed quite a sticky sludge which had adhered well to the paper. Given the limited water holding capacity of the paper, the areas with great concentrations of coffee granules had ironically developed the least. There is just a slight gray speckling effect where the coffee had a very limited action on the silver halides. The areas of most intense development were along the edges where the coffee and vitamin-C had mixed initially, and then in the broad areas of run-off which had well mixed caffenolCaffenol chemigram result

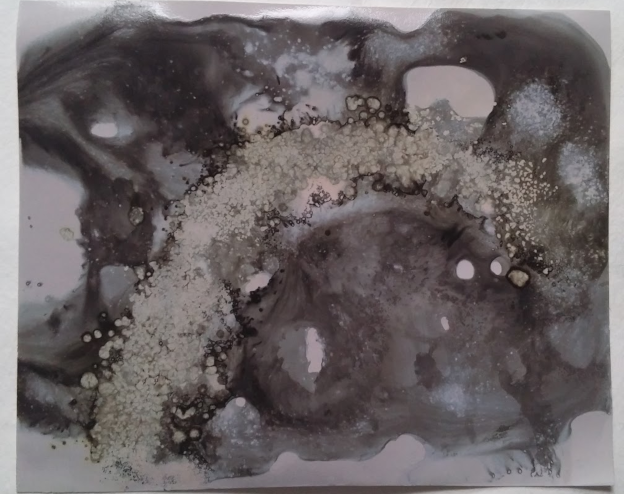
The process was repeated, but without pouring washing soda over the ingredients, just relying in that initially absorbed by the paper. The results were fairly similar to the first test, but with less development of the surrounding paper, as would be expected due to lack of run-off.

Caffenol chemigram resultThe results obtained were partially aligned with the initial expectations of the process but, as always when experimenting, there were surprises. In particular the inability of the paper to absorb sufficient washing soda solution was a key limiting factor in the results. It was surprising to see how the coffee + vitamin-C alone were fairly weak, but when they combined they became stronger than the sum of the parts. Finally the way the coffee became a sticky mass on the surface of the paper actually caused it to act as a chemigram resist, as well as a developer at the same time!

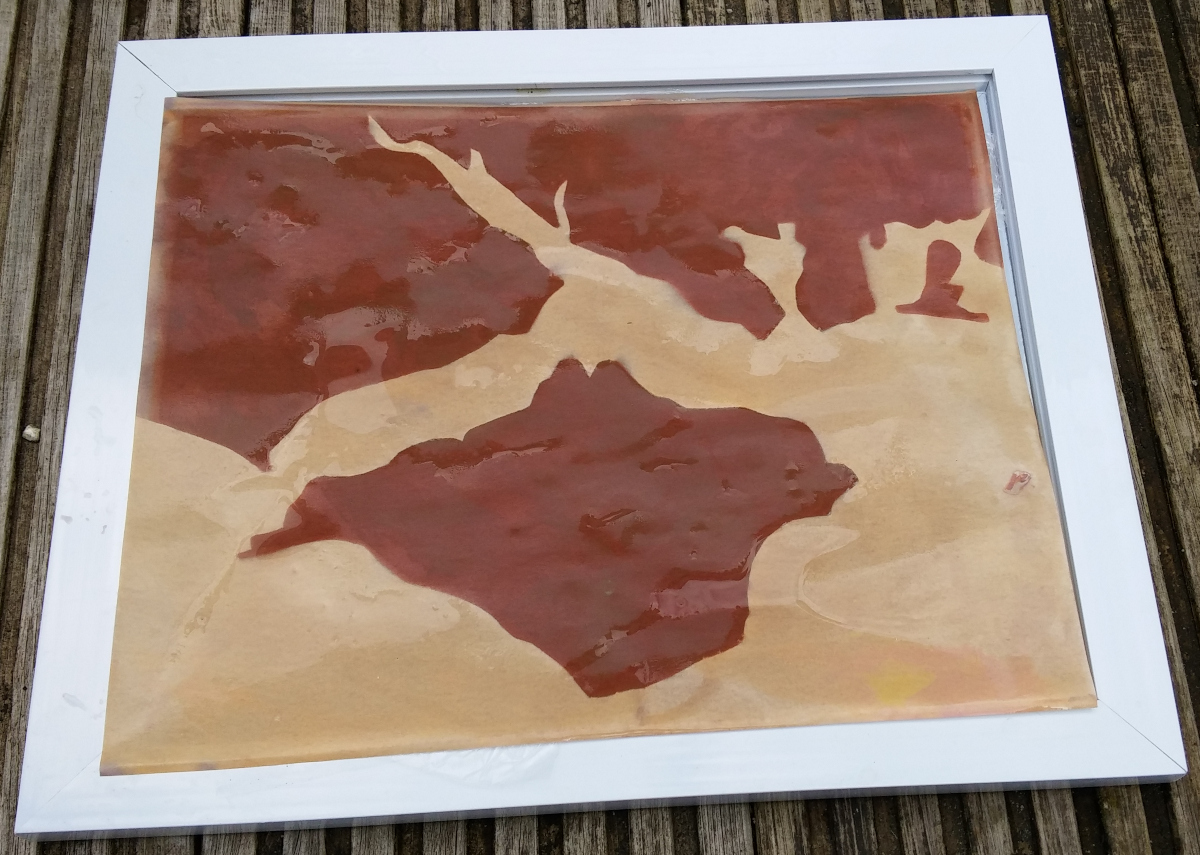
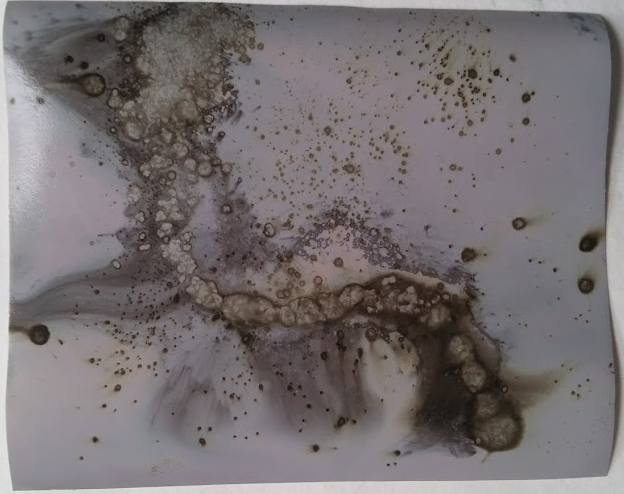
With the initial experiments successfully completed it was time to try some larger scale work with full sheets of 8×10 paper. The goal was really to just do more of the same but on a larger scale. The first work was fairly light on washing soda, thus forming broadly static patterns showing the texture of the vitamin-c powder and coffee granules, though there were some limited areas of runoff creating dynamic swirling patterns

Caffenol chemigram
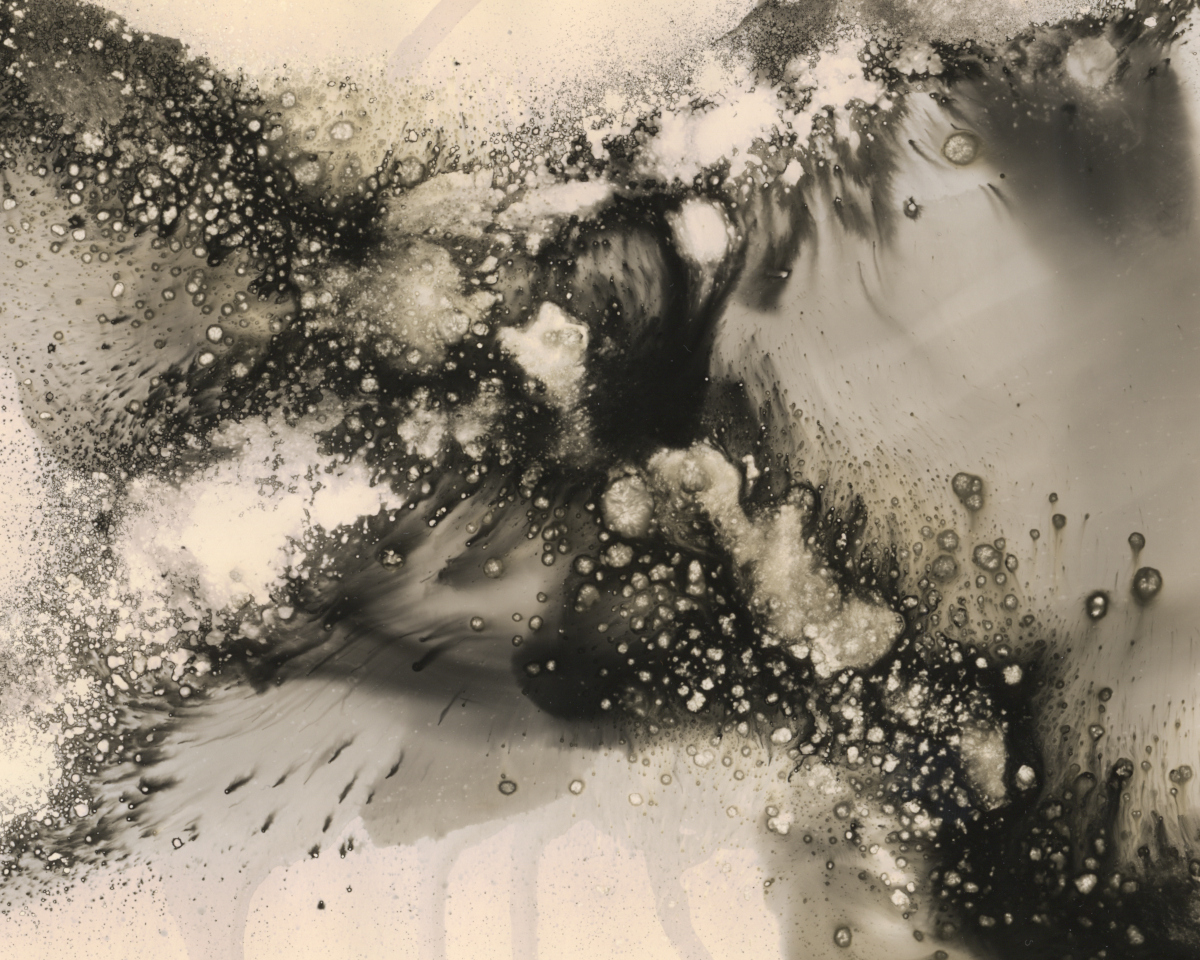
With the second print the aim to was make a very dynamic image showing the motion of developing liquid on the surface of the paper, at the expense of any fine detail.

Caffenol chemigram
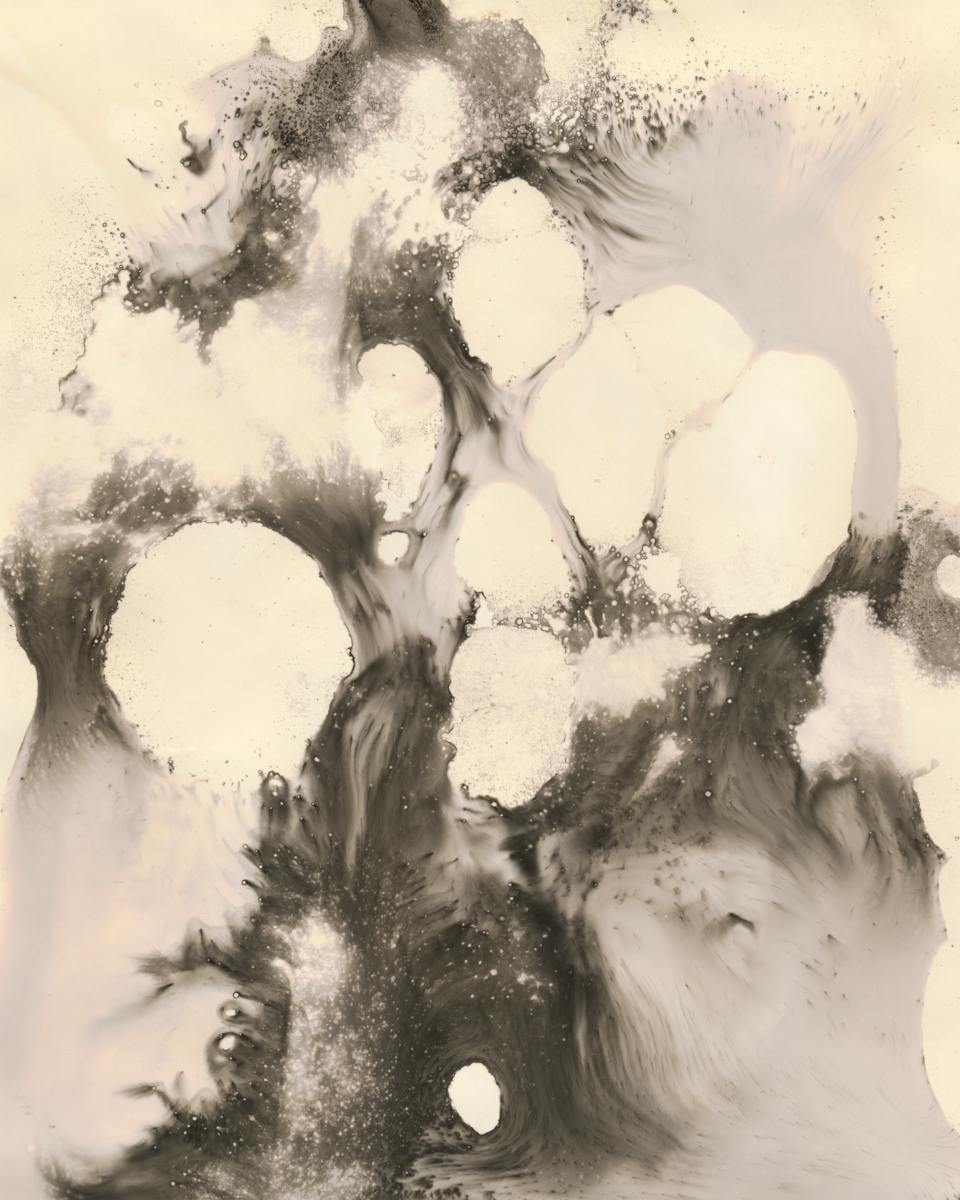
Pleased with the results of caffenol in a pure chemigram process, I decided to take it a step further and try to combine chemigram with a traditional B&W development process in the darkroom.

A while ago I took an simple photo of the Moon with a DSLR and teleconvertors which I then used to create a digital negative on acetate for printing as a cyanotype. Astrophotography is an increasingly popular endeavour for many people, but almost without exception the aim is to produce images with the best sharpness and finest detail the equipment will allow. An unfortunate result is that any two images of the moon will look broadly alike, and my own astrophotography images of the moon are no exception. So I decided that this digitally captured moon image would provide a good challenge as source material for creating a truly unique photographic print.

In the darkroom under safe light conditions, I placed a sheet of outdated Ilford FB 8×10 paper under the enlarger. The digital negative went on top of the paper for purpose of contact printing. From previous experience contact printing on this paper I just guesstimated the exposure at 15 seconds, with lens at f/8. The paper now has an invisible latent image ready to be worked on by the caffenol.

I soaked the paper in a washing soda solution, randomly sprinkled instant coffee and vitamin-C onto the paper and then just let it sit for a few minutes to give time for the caffenol to start working. Part way through I also added a very small amount more washing soda in some areas to encourage the development. After approximately 3-4 minutes (I wasn’t really timing this) I could see slight hints of the paper starting to turn gray in places. Washing off the caffenol residue though showed almost no development across most of the paper, which was initially disappointing.

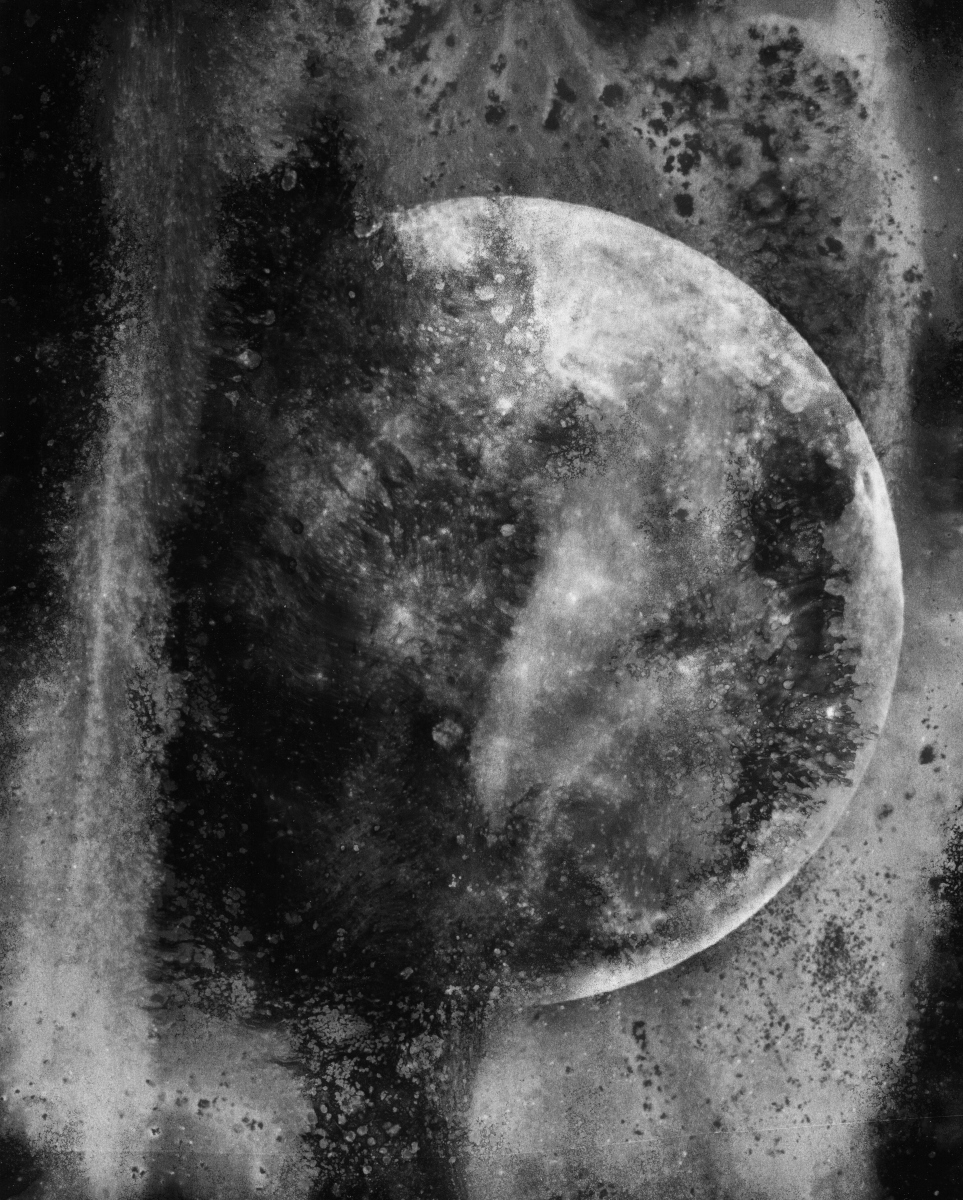
None the less I now put the print through a regular B&W dev, stop & fix process. Rather than leaving it in the developer for the full 1 minute though, I noticed it was developing quite fast and choose to just move it to the stop bath when it “looked about right” – about 35 seconds. What was happening was that although not really visible yet, the caffenol had indeed kickstarted the development across the paper and the normal developer was just needing to finish off the process. If I had let the image site in the developer for the full 1 minute it would have been over developed and lost some of the qualities of the caffenol granulation.

The result was thus incredibly pleasing image of the moon, which I hereafter title “Moon through a dirty window”

Chemigram caffenol contact printLooking at the results obtained shows that the idea of using caffenol in a chemigram process has great possibilities for image making. On its own it can be semi-controlled to create attractive abstract images, while when combined with a regular B&W printing process it turn an otherwise plain image into an intriguingly textured pleasing artwork. I’m very much looking forward to getting back in the darkroom to further work through the possibilities this offers

Stacking multiple images to reduce noise

One of the critical problems when producing astronomical images is to minimize the amount of noise in an image, while still being able to capture the very faint detail which is barely distinguishable from noise. The post processing technique used to address this problem is to merge together multiple images of the same subject. The constant signal in the images gets emphasized while the random noise gets smoothed / cancelled out. There is specialized software to perform stacking of astronomical images to deal with alignment between subsequent frames, as the earth’s rotation can cause drift over time if the camera mount isn’t compensating. The image stacking technique is not merely something for astrophotographers to use though, it is generally applicable to any use of photography.

Image stacking in a non-astrophotography scenarios is in fact simpler than one might imagine. The only physical requirement is that the camera is fixed relative to the scene being photographed, which is trivially achieved with a tripod of other similar fixed mounting facility. In terms of camera settings, it is necessary to have consistency across all the shots, so manual focus, fixed aperture, fixed shutter speed, fixed ISO and fixed white balance are all important. With the camera configured and the subject framed, all that remains is to take a sequence of shots. How many shots to take will depend on the quality of each individual image vs the desired end result. The more noisy the initial image, the larger the number of shots that will be required. As a starting point, 10 shots may be sufficient, but as many as 100 is not unreasonable for highly noisy images.

To illustrate the versatility of the image stacking technique, rather than use images from my DSLR, I’ll use a series captured from the night vision webcam of the Wurzburg radio telescope. A single captured frame of the webcam exhibits large amounts of random noise (click image to view fullsize):

Wurburg Radio Telescope single image


Over the course of a few minutes, 200 still frames were captured from the webcam. The task is now to combine all 200 images into one single higher quality image. Processing 200 images in a graphical user interface is going to be painfully time consuming, so some kind of automation is desirable. The ImageMagick program is the perfect tool for the job. It has a option “-evaluate-sequence” which can be used to perform a mathematical calculation for each pixel, across a sequence of images. The idea for minimizing noise is to take the median pixel value across the set of images. Stacking the images is thus as simple as running

# convert webcam/*.jpeg -evaluate-sequence median webcam-stack.jpeg

This is pretty CPU intensive process, taking a couple of minutes to run on my 8 CPU laptop. At the end of it though, there will be a pretty impressive resulting image:

Wurzburg Radio Telescope stacked imageThe observant will have noticed the timestamp in the top left corner of the image gets mangled. This is an inevitable result of stacking process when there is part of the image which is moving/changing in every single frame. In this case it is no big deal since the timestamp can either be cropped out, cloned out, or replaced with the timestamp from one single frame. In other scenarios this behaviour might actually work to your advantage. For example, consider taking a picture of a building and a person walks through the scene. If they are only present in a relatively small subset of the total captured images (say 5 out of 100), the median calculation will “magically” remove them from the resulting image, since the pixel values the moving person contributes lie far away from the median pixel values.

Going back to our example image, the massive reduction in noise can be clearly seen if viewing at 1:1 pixel size with the two images adjacent to each other

Wurzburg Radio Telescope comparison

With the reduction in noise it is now possible to apply other post-processing techniques to the image to pull out detail that would otherwise have been lost. For example, by using curves to lighten the above image it is possible to expose detail of the structure holding up the telescope dish:

Wurzburg Radio Telescope comparisonSo next time you are in a situation where your camera’s high ISO noise performance is not adequate, consider whether you can make use of image stacking to solve the problem in post processing.


Thoughts on the chemistry behind the lumen process

I’ve previously talked about my initial work with the Lumen process and later its combination with the chemigram process. In recent weeks I’ve been experimenting with a some old Kodak Autopositive paper and been amazed by the colour produced. When initially exposed it goes an intense crimson red colour, while this colour is lost during fixing, it is replaced by a fairly intense orangey-yellow colour which is almost as attractive.

Kodak Autopositive paper after initial lumen exposure

Kodak Autopositive paper after fixing lumen exposure

I had heard before that different papers can give wildly different colours when used with the Lumen process, but the papers I’d tried before this were all reasonably similar, so the results from the Kodak paper was a delightful surprise. It did, however, start me wondering what on earth is going on to form such colours from the POV of the chemistry. In order to figure out what might be happening during the Lumen process, it is important to first understand the chemical processes by which normal silver gelatin images are formed…

Traditional Silver Gelatin photographic process

Common photographic emulsion consists of crystals of one of the silver halides (silver bromide, silver chloride or silver iodide), suspended in a gelatin layer. Gelatin is chosen because it is permeable allowing the chemical agents (developer, fixer, toners) to easily access the light sensitive crystals. It also forms a good colloid ensuring an even spread of crystals across the substrate (paper).

Emulsion manufacture

The emulsion is formed by taking silver nitrate and mixing in a gelatin solution that contains halides (potassium bromide, sodium chloride, or potassium iodide). The silver nitrate reacts readily with the halides, the silver atoms combining with the halogen atoms, while the salt combines with the nitrate. Taking potassium bromide as the example halide, the reaction would be

AgNO3 + KBr => AgBr + KNO3

The silver halide molecules form light sensitive crystals, the size & shape of which determine the “grain” of the emulsion. Other active molecules in the gelatin also react with the silver and result in flaws in the crystal lattice. It is these flaws which in fact lead to the photosensitivity of the silver halide.

A number of other chemicals are added which will influence the chemical reaction, the formation of the crystals and thus the characteristics of the emulsion when later exposed to light. A pH buffer will influence the speed of the crystal forming reaction, a crystal habit former will influence the shape of the crystals, a ripener will encourage the formation of crystals, restrainer prevents the reaction taking place too quickly, surfactants lower the surface tension between the liquids to encourage mixing, a defoamer will hinder the formation of foam, stabilizers will prevent other undesirable chemical reactions taking place, biocides will kill any biological impurities in the mixture. While the vast majority of photographic paper emulsions are based on Silver Bromide, the choice of other chemicals used during the manufacturing process may vary wildly across manufacturers or product lines.

The emulsions are usually washed to remove reaction byproducts, specifically the salts and nitrates. Further additives will also be included to control the sensitivity of the emulsion. Usually paper is designed to only be sensitive to blue and green wavelengths of light, allowing use of a red safelight in the darkroom. There are some variations in the choice of sensitive wavelengths, hence the need to use special safelight colours with some papers. There are also panchromatic emulsions which are sensitive to all wavelengths and thus must be used in complete darkness with no safelight. Kodak Panalure is an example of the latter.

Exposure

As mentioned earlier, the silver halide crystals in the emulsion contain small defects leading to gaps in the lattice, as well as mobile silver ions. When a photon of light is incident on the silver halide crystals, it can liberate an electron from the halide. The electron migrates to an sensitivity site where it combines with a mobile silver ion to form a metallic silver atom. The halide atoms are released from the crystal and will collect in the emulsion. As further photons are incident on the crystal, the number of metallic silver atoms grows. These silver atoms form the so called “latent” image in the emulsion, that will be developed into the final image

Development

The goal of development is to intensify the latent image by many orders of magnitude – as much as 109. IOW the few 100 silver atoms in the latent image need to be turned into many 100’s of millions of silver atoms, becoming easily visible. This is achieved through a chemical reaction that converts more of the silver halide crystals into metallic silver atoms. The metallic silver atoms are opaque & non-reflective to light, producing the blacks in the image while the paper of course provides the whites. The key characteristic of the chemical(s) used as the developer is that it should have a much stronger effect on crystals which contain the latent metallic silver atoms after exposure. A developer which affected all crystals indiscriminately would simply result in fog across the entire emulsion.

The stop bath merely neutralizes the action of the developer chemicals, so won’t be discussed further.

Fixing

Once the desired image has been developed, there will still be plenty of silver halide crystals remaining in the emulsion. These are of course still light sensitive, so if left would cause the image to degrade / fog over time. Thus the goal of fixing is to remove all remaining crystals, leaving only the metallic silver image. Ordinarily a sodium thiosulphate solution is used as the fixer, as athough potassium cyanide is a viable alternative, the latter is significantly more toxic and dangerous to deal with. Again considering silver bromide, the reaction the takes place is

AgBr + 2Na2S2O3 => Na3[Ag(S2O3)2] + NaBr

Both of the molecules produced by the reaction with the fixer are soluable and can thus be removed by washing. Washing also serves to remove any unreacted sodium thiosulphate which, given time, is liable to remove the metallic silver of the print too.

Toning

There are a number of ways in which an image can be toned, with differing chemical techniques. Silver conversion toners work by replacing the metallic silver atoms with silver compounds, which exhibit a particular tone. Many of the compounds are in fact more stable than metallic silver atoms, so this can improve the archival quality of the image. Colour coupler toners work by coating the metallic silver atoms with a colour dye. Dye toners are similar, but they coat the emulsion as a whole rather than just the silver atoms. As the name suggests, metal replacement toners use a reaction that replaces the silver atoms with atoms or compounds of a completely different metal such as gold, platinum, copper.

11355997_1066984769998349_328261478_n

Lumen image of flowers & leaves on vintage Ilford FB paper

Lumen image making with Silver Gelatin

With an understanding of the traditional silver gelatin process, it is time to think about what might be going on with Lumen image making. First are some observations of the process in action

  • The entire paper is exposed to broad spectrum light immediately
  • Prolonged exposure to ultra-violet light is needed to form an image
  • After fixing the paper is no longer sensitive to UV light
  • Paper which is wet with water will form a more intense image
  • Different papers often result in different colour formation
  • The image colour will change during fixing
  • Old vintage papers often exhibit more extreme colours than modern emulsions

As the paper is exposed to broad spectrum light, essentially all the silver halide crystals will contain a handful of silver atoms (the latent image), so if developer is applied the image will go entirely black. The lumen image could be formed by a reaction with the silver halide or with the silver atoms. We know, however, that after fixer is applied, the paper is no longer sensitive to UV light. Fixer does not affect the silver atoms, only the silver halides. It follows that the lumen image formation must involve the silver halides, and not the metallic silver atoms. As compared to visible light, UV light has higher energy levels and is well known to have an effect on organic molecules and assist in some chemical reactions. Thus it is plausible that UV light triggers a chemical reaction that would otherwise not occur under normal darkroom enlarger exposure.

Silver gelatin emulsions are based on silver-chloride, silver-bromide or silver-chlorobromide crystals. Based on the range of colours shown in lumen prints on flickr or instagrams, that small handful of different types of crystal appear insufficient to produce the wide range of colours seen on different papers. This rather suggests there is a reaction taking place which involves some other molecules present in the emulsion, besides the halide crystals. From the description of the manufacture of emulsions earlier, it is known that there are a wide variety of chemicals involved, beyond the silver nitrate and halides. While attempts are made to wash them out of the emulsion after production, it is likely that chemicals remain, particularly with older papers when the manufacturing process was less well refined. Thus it is plausible that the lumen process involves a chemical reaction with leftover agents from the manufacturing process.

There is a question of why water might act to intensify the image colour, speeding up image formation. Remember that gelatin emulsion is intentionally permeable to allow developer/fixer chemicals to access the silver halide crystals during traditional processing. Water itself is not sensitive to UV light, so unlikely to be chemically involved in the chemical reaction. Most likely is that water is acting as a transport to ensure a fresh supply of the agents of the chemical reaction so it that it can continue rather than fizzle out.

Based on the above information, a guess can be made as to what takes place during lumen image formation.

  • Ultra violet light is incident on the silver halide crystals, liberating halides and silver atoms.
  • Ultra violet light is incident on unknown compounds in within the emulsion, breaking them down to release further (unknown) atoms/ions/molecules.
  • These atoms/ions/molecules react with the silver atoms to form a variety of silver compounds.
  • Water improves mobility of the atoms/ions/molecules, ensuring the reaction between the silver atoms and other compounds in the emulsion continues at a reasonably high rate as compared to when the emulsion is dry.
  • Different silver compounds naturally exhibit different colours, and so the variety of chemicals left over from the manufacturing process of the emulsion will affect what compounds (and thus colours) can form.
  • Each compound will also have different chemical stability. When the image is fixed, some of the silver compounds are broken down again, resulting in the fading in intensity of the lumen image and distinctive colour shifts. The silver compounds which were more stable do not get affected by the fixer and so remain to provide the final image.

It is frustrating that there is a still a giant unknown of just what molecules in the emulsion are reacting with the silver atoms. Understanding this would likely require access to company records about their manufacturing processes, and/or access to xray spectroscopy equipment.

If this broad hypothesis is correct though, it is probably not the age of the paper affects the different colours seen in lumen printing, but rather the process that was used at the time of production that matters. ie the 40 year old kodak autopositive paper that produces intense crimson colours, probably would have had this same effect the if used for the lumen printing the day after it was made vs today. IOW, taking some modern emulsions which exhibit uninteresting lumen results and storing them for 30 years would not have an impact on what kind of colours a lumen print in the future will produce. This potentially makes the old vintage papers all the more valuable to collect today – once they’re gone, they’re gone and the possibilities they have for lumen printing will be lost forever. Off to eBay again….

If anyone knows better about the chemistry of Lumen image making I’d love to hear about it in the comments, as my own knowledge is limited to ancient school chemistry classes and whatever I could find in the internet…

Chemigram combined with Lumen image of flowers & leaves on vintage Ilford FB paper

Chemigram combined with Lumen image of flowers & leaves on vintage Ilford FB paper